However, there might be times when you want to retrieve information that a basic query may not be able to return. For this, you will use the Freehand SQL method. Take note that when using the freehand SQL that you must have knowledge of SQL and understand the data source that you want to query.
Grant Access
To write a Freehand SQL report in Yellowfin you will need access. An administrator will be able to grant you access by changing your role. Follow the steps below:
Go to Administration – Admin Console - Roles.
Click on the applicable role to edit.

Expand the “Report Builder” tab.
Make sure that the checkbox next to “Report Types” is selected to grant the users access.

Create a Freehand SQL report
Next, you will create a report using the Advanced Authoring option. Follow the steps below:
Create a new report.

Enable the Advanced Authoring option to create a Freehand SQL report.

Make sure that Freehand SQL is selected in the Author Method dropdown. There are also other options, for example: Jasper Reports and Reporting Services.
Select your data source. In this example, I will select the Ski-Team data source that ships with Yellowfin.

Proceed to the Freehand SQL builder by clicking on the Create Analysis button.
Here you can enter your custom freehand SQL query. On the left you will see a list of the tables and fields that are available in your data source.

Enter the query below. Please note that this should only be used for advanced queries that cannot be created using the Drag and Drop builder - limited formatting options are available in the report builder when using Freehand SQL reports.
SELECT *
FROM athletefactClick on Validate to test your query against the data source. If the SQL is valid, the following message will be displayed.

Once you are happy with your SQL statement, click the Save button.

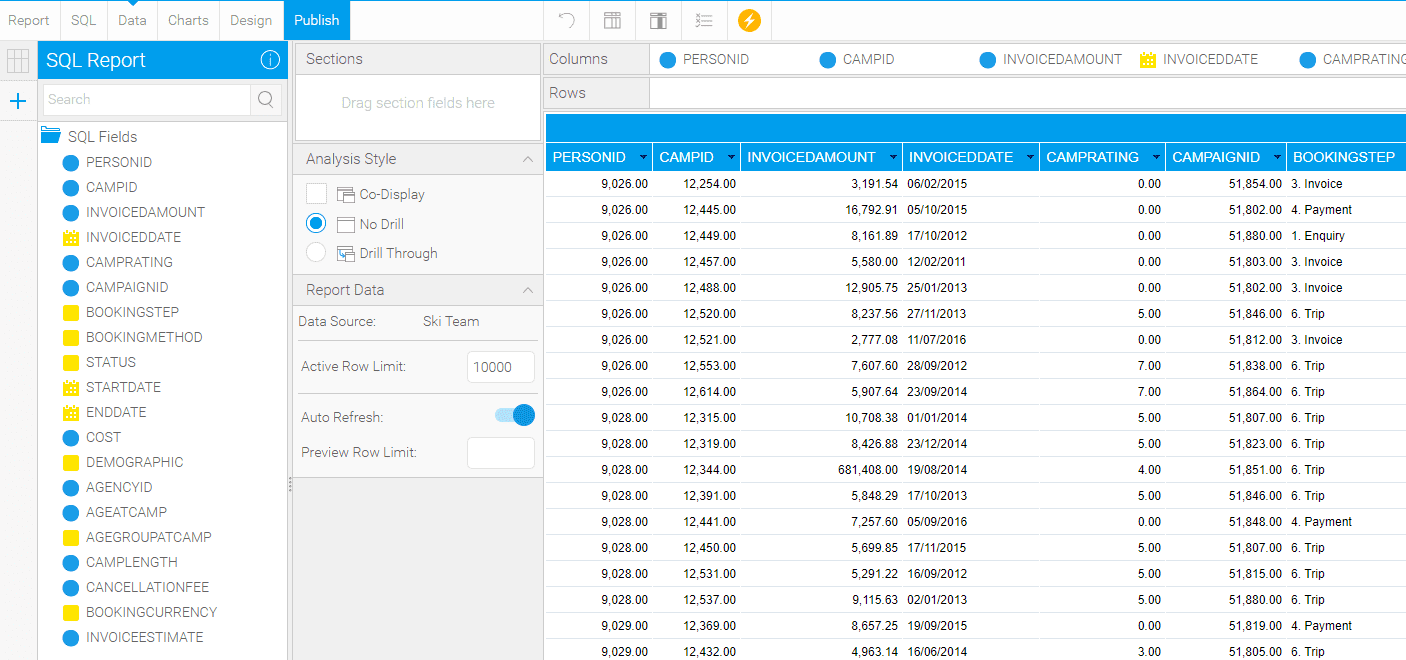
Click on the Data step at the top left of the screen to proceed to the report builder. From here you can create your report using the Drag and Drop builder.

Add a filter
If we want the user to be able to filter the data, we can achieve this by adding a {?} parameter to the SQL statement. In our example, we will limit the results to only return the records where the STATUS is equal to “Cancelled”.
Please note that filters in your Freehand SQL statement are treated as mandatory filters – you cannot choose to omit the filter value and return all records.
Click on the SQL step at the top of the screen to go back to the Freehand SQL statement.

Click on the Edit button at the bottom right to change the SQL statement.

Add the WHERE clause below to your SQL query and click on Validate.
WHERE status = {?}

Yellowfin identified that there is a parameter in your SQL query and will automatically assign data type for the parameter based on the field type that you are comparing it with.

If you are querying a MS SQL Server database, Yellowfin will prompt you for the data types.
Click on Save and proceed to the Data step.
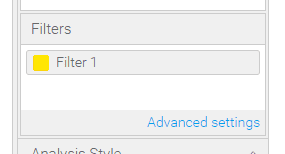
You will now have a user-prompt filter (Filter 1) available in your report.
Proceed to the Design step.

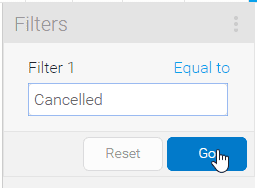
Enter “Cancelled” in the Filter 1 box and click on Go. You should now see the cancelled records.
Rename the filter
At the moment Yellowfin displays “Filter 1” as the name or description for the filter or user-prompt. To make your report more user-friendly, you can change the description to something more relevant or meaningful.
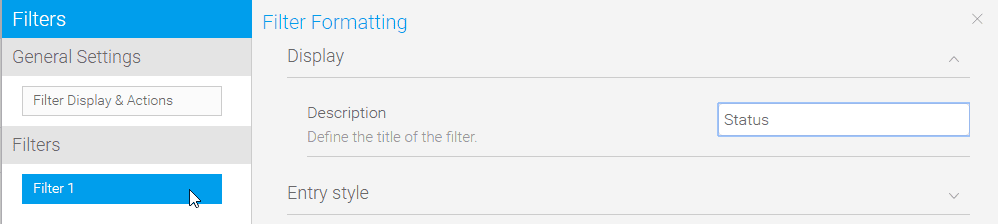
Click on the Filter Formatting icon at the top of the screen.

Select “Filter 1” and change the description.
Close the filter formatting window.

The name of the filter is now changed.

Display a list of pre-defined options
To make it even more user-friendly, you can display a list of available options for the filter so that the user can choose a value instead of typing it.
Cached drop down filters are available via selecting a custom query for the entry style of the specific filter.
Follow the steps below:
Click on the Filter Formatting icon at the top of the screen.
Select the “Status” filter and change the Value Entry Method to Value List Selection.

Because this is a Freehand SQL report, you have to enter a custom query for the unique values. Make sure that Custom Query is selected for the Value List Setup option.

Select the Ski-Team data source and enter the following query:
SELECT DISTINCT status
FROM athletefact
Test the query.

Click on the “Refresh Now” link to cache the values. You will see the message below once the values are cashed.

Close the filter formatting window.
You will now see a drop down list displayed for the Status filter.

Other examples
Other examples of adding filters to your SQL query include:
Specifying a data range filter, for example Between a “From Date” and “To Date” will look as follows:
SELECT *
FROM athletefact
WHERE invoiceddate BETWEEN {?} AND {?}
If you need a filter with multiple possible input values, use:
SELECT *
FROM athletefact
WHERE bookingmethod = ({?}) -- Note the additional brackets.
You can also declare variables and use the same filter value in different places. Please note that I could only get this to work in MS SQL Server.
DECLARE @demographic varchar(50);
SET @demographic = {?}
SELECT *
FROM camp
WHERE camp = @demographic;