
The good news is that Yellowfin created a plug-and-play Google Analytics Connector that gives you access to pre-built reports and dashboards to analyze this data with less time and effort. You also have the ability to create custom reports and blend your Google Analytics data with data from other data sources.
In this article we will be looking at setting up and configuring the Google Analytics Connector. The first step is to download the connector from Yellowfin's Marketplace.
Downloading the connector
Google Analytics is just one of Yellowfin’s many API connectors for third-party web applications which are all available through the Yellowfin Marketplace.
Go to www.yellowfinbi.com and click on the Marketplace link at the top right of the page.
Click on Connectors and locate the Google Analytics Connector.

Click on Download. You will be required to log in before you can download the connector. The connectors are all available for free but you will need to speak to your Yellowfin account manager to arrange access.
Loading the connector
Once downloaded, log in to Yellowfin and navigate to the Plugin Management page in the Admin Console.


Click on the Add button to load a new connector.

Enter a name and description.

Drag the connector onto the New Plugin window, or click on the icon to open browse in order to locate it.
The connector will now be processed. This takes a while and will vary depending on the size of the connector.

Click Submit to load the connector.

Setting up the Google Analytics connection
Create a new data source by clicking on the Create Button and select Data Source

Select the Google Analytics Connector.

Give your connection a Name and Description. This should describe the connection not the connector, as you can use the same connector multiple times. In our example, I am going to analyze the data for this blog: www.deepdive.co.za.

Click Authorize Google Analytics.

Choose your Google Account and click on Allow to give Yellowfin access to your Google Analytics data.

Google will generate a unique pin which should be copied to the “Enter Pin” field.
Click Validate Pin. Yellowfin will add your Access Token, Website and Profile IDs that are available. If your Google Analytics account has multiple websites, these will also appear and you will need to delete the website and profile ID’s that are not relevant. Yellowfin’s Google Analytics Connector can only work with one website per connection – set up a new connection for each website.

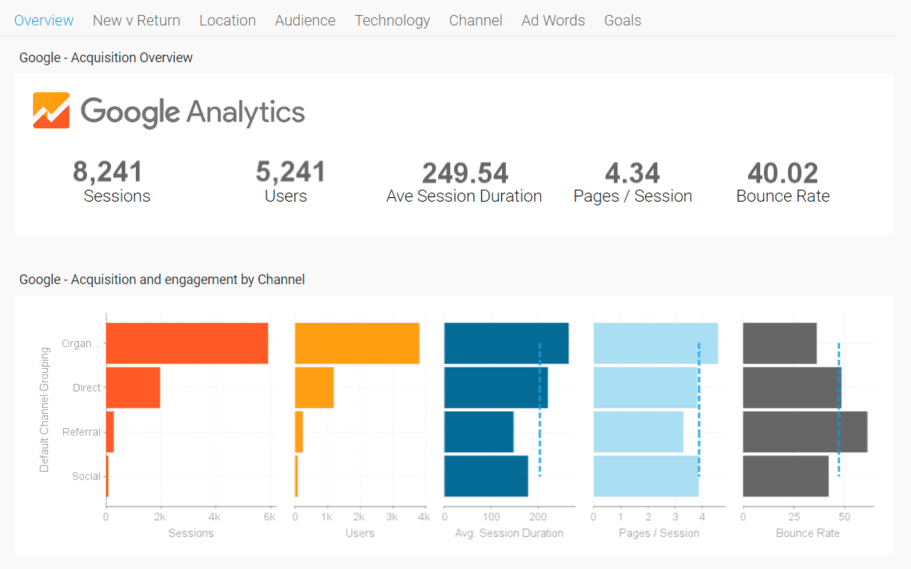
Launching the pre-built content
Locate and open the “Google Analytics” dashboard from the Browse page.
Yellowfin also makes it easy to create custom insights from your Google Analytics data, in other words, create your own reports, dashboards and storyboards. This can be achieved by accessing the Google analytics view that was created as part of the pre-built content.
That’s it! You have successfully connected Yellowfin to your Google Analytics and you will now be able to view your website statistics.